an introduction to r-CAST
Developing Simple Agents Using Decision-making Modeling and the R-CAST Architecture
Matt Prindible
The Laboratory for Intelligent Agents
College of Information Sciences and Technology
The Pennsylvania State University
all rights reserved
© 2006. This R-CAST tutorial, the R-CAST software and all its examples are copyrighted. You should not copy, distribute, or publish any part of the tutorial, ideas, code, or examples without obtaining explicit permission from Dr. John Yen, Pennsylvania State University.
Credits:
Initiate: J. Yen
Initial Design: S. Sun, X. Fan, G. Airy, B. Sun
Design Discussion: S. Sun, G. Airy, B. Sun, R. Wang, S. Zhu
Design: S. Sun
Implementation: S. Sun
Design and Implementation Support: M. Davis
Paper: X. Fan, S. Sun, J. Yen, M. McNeese, B. Sun, G. Airy
Tutorial: M. Prindible
For more information. Visit: http://agentlab.psu.edu/
r-cast 2.5 system requirements
Minimum specifications. Before implementing R-CAST in any simulation or runtime environment, please make sure the system is running the following minimum specifications. R-CAST is compiled in Java 1.4, and therefore requires Java 2 Runtime Environment version 1.4.0 or later. For the domain adapter, R-CASTs uses the latest NetBeans Integrated Development Environment (v5.0 or later). However, any IDE should be compatible for work with R-CAST development. Two components of R-CAST require ancillary toolkits for visualization and speech synthesis.
Prefuse Information Visualization Toolkit. Alpha release or later: http://prefuse.sourceforge.net
FreeTTS Speech Synthesizer. Version 1.2.1 or later: http://freetts.sourceforge.net
Optimized configurations. The run-time system requirements can be reduced by running agent components without a user interface, and by editing the agents configuration file to include only the necessary components.
table of contents
1 introduction
What is R-CAST?
The R-CAST architecture
The R-CAST cognitive model
The R-CAST information management model
2 beginning development
Objectives
Developing a scenario
Getting started
3 the active knowledge base
Overview
FactTypes
Rules
Facts
Configuring the AKB
Agent batch process file
The AKB user interface
Commands
Asserting facts and validating rules
Status check
4 RPD- the experience base
Overview
The RPD process model
ExperienceSpace
Experiences
Configuring the EB
The RPD user interface
Status check
5 the process manager
Overview
Operators
The Domain Adapter
Plans
Processes
Choices
Configuring the PM
The PM user interface
Status check
6 configuring an agent
Final configurations
Request Whiteboard
Information Manager
7 agent run-time
Identifying syntax errors
Identifying logic errors
Runtime
8 Whats next
Status check
Multi-agent systems and information sharing
appendix A
Sample active knowledge base file
appendix b
Sample experience base file
appendix C
Sample process file
appendix D
Sample configuration file
list of figures
Figure 1.1: The R-CAST Decision-making Process Model
Figure 1.2: The R-CAST Cognitive Model
Figure 1.3: The R-CAST Information Management Model
Figure 2.1: Basic Syntax
Figure 3.1: Declarative Knowledge
Figure 3.2: FactType Simple Syntax
Figure 3.3: FactType Formal Syntax
Figure 3.4: Complete FactType
Figure 3.5: Rules Syntax
Figure 3.6: Facts Simple Syntax
Figure 3.7: Facts Formal Syntax
Figure 3.8: Knowledge Base Configuration
Figure 3.9: MS-DOS Batch File
Figure 3.10: The AKB Interface
Figure 3.11: Commands
Figure 3.12: Results and Rule Firing
Figure 4.1: Flat ExperienceSpace Structure
Figure 4.2: Hierarchical ExperienceSpace Structure
Figure 4.3: The RPD Process Model
Figure 4.4: ExperienceSpace Syntax
Figure 4.5: Experience Syntax
Figure 4.6: Experience Base Configuration
Figure 4.7: Updating the Agents Components
Figure 4.8: The RPD Transition State Flow Chart
Figure 4.9: The RPD User Interface
Figure 5.1: The Process Flow
Figure 5.2: Operator Syntax
Figure 5.3: Simple Domain Adapter
Figure 5.4: Plan Syntax
Figure 5.5: Processes
Figure 5.6: Choices
Figure 5.7: Process Manager Configuration
Figure 5.8: Updating the Agents Configuration
Figure 5.9: Commands
Figure 5.10: The Process Manager User Interface
Figure 6.1: Request Whiteboard Configuration
Figure 6.2: Information Manager Configuration
Figure 6.3: The Information Manager User Interface
Figure 6.4: Handling Requests Through the Request Whiteboard User Interface
Figure 7.1: Common Syntax Error
Figure 7.2: Component Configuration
introduction
What is R-CAST? Recognition Primed Decision-making enabled Collaborative Agents Stimulating Teamwork, or R-CAST is an agent architecture developed at the Pennsylvania State University to study (a) high-level cognitive behaviors such as adaptive decision making and planning, and (b) team behaviors such as collaboration and information sharing. The R-CAST architecture is very flexible in that the architecture can be configured for a wide range of modeling purposes. R-CAST includes a set of cognition-inspired components that are a knowledge base and reasoning engine, a process manager, a communication manager, an information manager, a task manager, an RPD decision model, and adapters for various domains. The figure below shows an R-CAST decision process model that is composed of a reasoning engine, an RPD model, a task manager, and a process interpreter. Each component has its own parameters that can be adjusted according to interpretation needs. Each component also has its own knowledge representation. To build a model, one has to (a) determine what components are involved to compose the model, (b) analyze tasks and elicit knowledge for each component, and, (c) determine how the components should be configured.
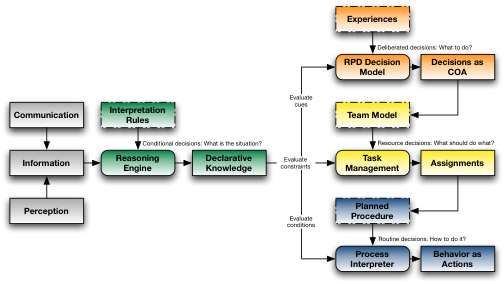 Figure 1.1: R-CAST Decision-making Process Model
The R-CAST architecture. The six main components that make up R-CAST are the active knowledge base (KB), the recognition primed decision-making component (EB, standing for experience base, another term for the RPD component), the process manager (PM), the information manager (IM), the communication manager (CM), and the configuration manager (CFM). R-CAST also utilizes a recommendation module (not covered in this particular introduction) that uses a weight-sum approach to generate scores and recommendations. Because R-CASTs architecture is component based, individual components can be configured seamlessly for a number of tasks and situations. For example, an agent consisting of an active knowledge base and a process manager can be considered a basic agent, capable of executing user determined processes based on knowledge and rules of the agents environment.
Modeling and visualizing R-CAST. In order to understand how an agent functions, it is important to understand how the individual components of the agent interact with each other to achieve a certain goal or result. The first model of the R-CAST architecture, the cognitive model, explains R-CAST anthropomorphically as actions or results based upon 3 domains: declarative knowledge (KB), procedure knowledge (PM), and knowledge from prior experiences (EB), while the second model takes an information management approach to describing the actions and processes within an agent. Each model in this guide is based on the Decision-modeling Agent, an agent with an experience base, a knowledge base, and a process manager.
The cognitive model. In the diagram below, the work flow for the agent using this particular model is outlined. In this model, explicit facts within the agents knowledge base along with those learned through experience (episodic memory) allow the process manager to make decisions based upon what the agent knows about its environment. Once the process manager acts on its procedural memory, an action is sent to the domain adapter. The domain adapter is a user generated file that controls the actions from the process manager, while not explicitly part of the cognitive model, think of it (while staying consistent with the physiological approach) as being the interface between the brain and the peripheral nervous system. Once the action is completed, it is evaluated and stored into experience knowledge.
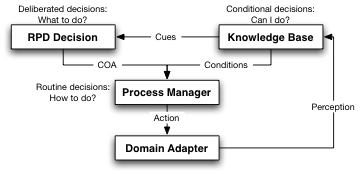
Figure 1.2: The R-CAST Cognitive Model
The R-CAST information management model. The information management model, while much more complex, shows the more intricate details of information sharing, investigation, and anticipation within the agent. At the highest priority is information requirement planning, the notion that each investigation, inquiry, diagnosis, requirement, is fulfilled, and that each anticipatory requirement is satisfied. The means to reach this goal are quite simple: demand information and have a method to supply it. However, the way an agent does this varies in different ways and can become quite complicated. For instance, how an agent investigates depends on investigation strategies, which define the sequence of investigation types: inquiry-diagnose-investigate, or investigate-diagnose-inquiry (3a,b,c). With each method of investigation, there can be multiple solutions: an inquiry can yield multiple sources, and investigation can have multiple methods, and a diagnosis can utilize multiple rules. Upon completion of an investigation, the investigation state will either be satisfied, cancelled, or failed.
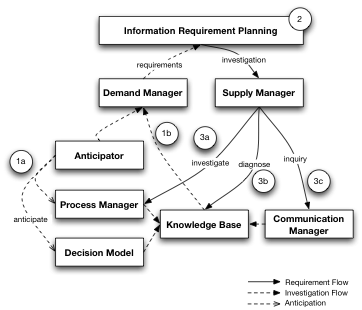
Figure 1.3: R-CAST Information Management Model
beginning development
Objectives. After completing this guide to developing agents using the R-CAST architecture, you should be able to identify the system and agent requirements, develop an agent, execute and run an agent, monitor an agent through its graphical user interface (GUI), and control an agents behavior through the GUI. The first example application created in this tutorial is a rather uncomplicated application. Though the first application is very simple by design, performs a very trivial task, and appears almost unintelligent, consider it R-CASTs remix of the classic hello world application.
Developing a scenario. The purpose of an agent in the R-CAST architecture is exactly what it says: Collaborative Agents Stimulating Teamwork. In most practical cases, the purpose of an agent will be to assist in solving or solve a problem with a real-world application. In this example, the problem is finding the most economic way to travel to work. The scenario should clearly identify objects within the agents environment, rules the agent must obey, a course of action, and the overall goal; the better the scenario, the easier the following steps are to complete. For example, the scenario for the sample application in this tutorial would be similar to:
Driving to State College on a regular basis presents several unique problems that can change with each and every trip. Gas prices, road construction, and traffic bottlenecks affect travel differently each day. In order to select the best route of travel, all variables must be taken into consideration. With gas prices expected to rise this summer, the shortest route would be the most obvious result. However, with construction on I-99 changing on a day-to-day basis, the ability to get to State College on time and without wasting precious gas while sitting in traffic can be compromised. Taking the back roads to State College has absolutely no road construction, but is considerably longer (in terms of distance). However, on some occasions (when construction is heavy, and/or traffic is backed up in Port Matilda) the back route can be faster. Although all variables are heavily interrelated, each of these variables has a certain precedence over one another. For example, getting to State College on time is more important than saving a marginal amount of money on gasoline, sitting in construction on I-99 for a marginally longer period of time during times of lower gas prices is acceptable, and of course, in the event of a tie, I-99 is accepted because it is the easier route. Based on the current conditions of each variable for each day and past driving experiences, it is up to the agents to assist in a decision on which route to take.
Getting started. By analyzing this scenario, we can see that some of the objects in the agents environment that it may encounter are gas price, road construction, traffic, and several associated opportunity costs and utilities. The scenario also defines several rules (but not all the rules) that place constraints on the agents decision. Rules such as sitting in construction on I-99 for a marginally longer period of time during times of lower gas prices is acceptable describe the agents environment and influence its decision to fit the real world. The last sentence in the scenario defines the course of action and the overall goal of the agent. The information found in this scenario will be used to populate the agents knowledge base, and process manager.
Before we start, it may be helpful to consider some of the following syntax:
Variables: denoted by a ? (?position, ?condition)
Symbols: name of each variable, quotes or underscores can be used to join multiple words (University Park, penn_state)
Comments: denoted on each line by a ; or #
Functions: standard arithmetic and string comparison operators (+, -, *, /, rand, dis, =, eq, <, <=, >, >=)
The active knowledge base
Overview. The goal of the active knowledge base is to explicitly represent knowledge through its information dependency relations on two levels. The first level, called the FactType, represents knowledge at an abstract level called a schema, a generalized description of the agents environment. Another way to think of the FactType is as the class definition in object oriented programming languages. The second level of representation is called the Fact. A Fact is an explicit definition of a FactType, or, in reference to the analogy of an object oriented programming language, and instance of its FactType class definition. By combining these two levels, an agents knowledge base can be populated with declarative knowledge. Also within the knowledge base are [optional] rules that apply constraints or define meanings within the agents environment.
To begin creating an active knowledge base, create a folder in which you will build your agents components and begin by creating a new file ending with the extension .kb. Also in this folder, you should place R-CASTs application archive, r-cast.jar, the icon file for the agent, and a configuration file ending with the extension .conf. The first modification to the configuration file includes changes to the agents overall configuration.
FactType. Returning to the original example of determining the most economical route to travel to a destination, the FactTypes of the agents environment must first be defined. Each FactType must be defined before facts can be asserted into the knowledge base, or rules that use the FactTypes can be fired. For this particular example, FactType definition are very simple, only requiring the FactType name and any of its parameters (called simple syntax).
(FactType laneClosed (?route ?numberOfLanes))
FactTypes can also utilize other functions such as template, source, and time (called formal syntax). The template function is used for parsing facts from natural language, or converting facts to natural language. A time value represents the amount of time before a fact expires. This time can also be change for specific instances of the FactType. Sources are used in multi-agent collaboration, a source is used for an agent planning an investigation, or support of evidence.
(FactType laneClosed (?route ?numberOfLanes)
(template There are ?numberOfLanes closed on ?route)
(source (roadConstructionAgent getLanesClosed))
(time 60)
)
This fact type is now able to assert facts into the knowledge base and query the knowledge base using natural language (covered in The AKB user interface), investigate and retrieve the information from a plan getLanesClosed from another agent named roadConstructionAgent. This particular FactType has an expiration time of 60 seconds, meaning a new fact must be asserted within this time. However, each instance of FactType laneClosed can have its own, unique expiration time.
For defining the remaining FactTypes in this agents environment, and completing its schema, we return to the scenario. Several other candidate FactTypes (including the previous road construction FactType) include a gas price, the added or gained utility from the gas price, conditions of road construction such as a lane being closed or traffic being stopped, and conditions of traffic such as its density. All of the FactTypes for this example can be defined using the previously described simple syntax because this example only requires one agent, and for the time being, we will not be using natural language assertions or queries. At this point in time, our agents knowledge base is populated with a generalized description of its environment, or a schema.
Rules. Rules within an agents knowledge base are optional depending upon the situation. In our example, several rules are needed to define the utility or opportunity costs depending upon certain conditions. A rule consists of a rule name, an antecedent, and a consequent state.
(Rule determineHighGasPrice # Rule definition: must be unique
(gasPrice ?gasPrice) # Antecedent (conditional statement)
(< ?gasPrice 2.95)
-> # Antecedent-consequence separator (therefore...)
(gasPriceUtility low) # Consequent state
)
This particular rule, named determineHighGasPrice contains the logic and conditions necessary for the agent to make decisions about whether or not a certain gas price is high or low. If after comparing the value stored in the variable ?gasPrice of an instance of the FactType gasPrice to a pre-determined value of 2.95 (called the antecedent), the condition is true, the variable ?utility in an instance of gasPriceUtility will be set to low (called the consequent state). By combining rules and facts, the agent can generate a series of implied facts. In this particular example, with a gas price of $3.15, an agent can imply that the price of gas is high.
Facts. Facts are simply instances of predefined FactTypes, meaning that each variable or parameter in the FactType now has and explicit value. Facts can be asserted in a variety of ways. Within the knowledge base, facts can be explicitly defined using simple or formal syntax, much like the FactType. The name of the Fact must align with a FactType, and the parameters set should not contain variables.
(Fact laneClosed (I99 1))
If the FactType was defined using the formal syntax, the Fact should also use the formal syntax. The formal syntax for a Fact closely resembles the formal syntax for its FactType (sans the variables, obviously). This fact now contains a source with a method to get the information (for support of evidence) and an expiration time of 60 cycles.
(Fact laneClosed (I99 1)
(source (highwayObservationAgent howManyLanes))
(time 60)
)
Along with defining facts directly in the knowledge base, facts can also be asserted into the knowledge base through the user interface. Asserting facts through the user interface does not only make the agent a little more dynamic, but it also serves as a method to validate a knowledge base.
Configuring the AKB. Before using the active knowledge bases user interface, the implementation of a configuration file must be completed. The configuration files contains information about the agents architecture that is used at run-time. In order to begin asserting facts through the user interface to validate the knowledge base, the agent (at this point, only containing a knowledge base) and its interface must be properly configured. The following values must be uniquely configured for each agent.
kbImpl = edu.psu.activeknowledgebase.AKB # Defines the location of the AKB implementation
kbFile = Travel_Opt_Agent.kb # Defines the location of the agents AKB
kbClock = 1000 # Defines the agents thread cycle time, in 1/1000 of a second
kbGUI = true # Determines whether or not to display the agents AKB user interface
kbSpeakNaturalReply = true # Determines whether or not to use R-CASTs speech synthesizer
Agent batch process file. At this time, the agents project folder now contains R-CASTs application archive, an active knowledge base file, and a configuration file. In order to implement these components and begin using the agent, an MS-DOS batch file (.bat) must be created to run each component simultaneously. Each batch file contains the commands to run R-CASTs application archive and the configuration file for each agent. In this example, only using one agent, the batch file is very simple.
java -jar r-cast.jar Travel_Opt_Agent.conf
The AKB user interface. The active knowledge base user interface provides an organized view of the agents knowledge, as well as variety of input options to dynamically modify the agent during run-time. The FactType Selector is used to view select the FactTypes within the agents knowledge base, and from there, the selectors and displays for the Information Dependency Relation (IDR) FactType Level, IDR FactType Instance Level, and the Fact List Level can be used to display organized views of the agents knowledge as well as relations, supporting details, assertions, and implications. The left-most portion of the user interface is mainly used for input and user-submitted requests. By using the commands menu, the user has access to a range of functions that can query, assert, and retract facts (as well as a host of others) into the agents knowledge base, a command prompt in the agents shell also provides the same interaction. At this point, interaction with the agents knowledge base will be limited to asserting facts and firing rules, however this limited functionality is useful for validating the agents knowledge base.
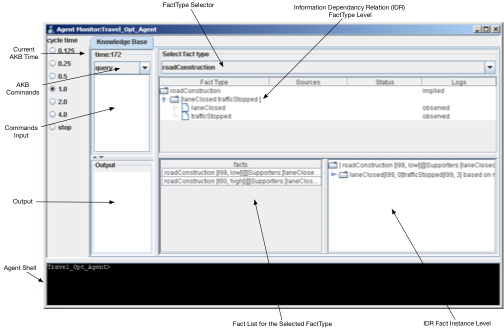
Figure 3.10: The AKB Interface
Commands. Within the AKB Commands menu and also through using the agents Command Prompt, there are a number of ways to modify the information within the knowledge base. When using the Commands menu, the portion of the code in italics can be left out, and after typing the request, a function can be selected from the menu. When using the agents shell, or making requests from the command prompt, the portion of code in italics must be included.
Query: returns a requested parameter ( query ((gasPrice ?gasPrice)) )
Natural Query: returns a formatted request for a parameter, using a defined template ( naturalQuery ((gasPrice ?gasPrice)) )
Assert: asserts a fact into the knowledge base ( assert ((gasPrice 3.15)) )
Natural Assert: asserts a fact using natural language, defined in the template ( naturalAssert Gas is 3.15 )
Diagnose: diagnoses the predicate ( diagnose ((gasPrice 2.79)) )
Print KB: prints and displays the entire knowledge base ( printKB )
Parse KB: parses and text within the knowledge base ( parseKB )
Retract: retracts a fact from the knowledge base ( retract ((gasPrice 2.79)) )
Asserting facts and validating rules. Since R-CAST does not implement any sort of formal debugging for the components of an agent, asserting facts to fire rules within the knowledge base interface provides to useful way to make sure the knowledge base is valid, and that rules are fired in their intended way. To begin, clear the knowledge base file of its facts by commenting out each line, or deleting the facts. When the agent is run, the FactTypes and rules will be defined in the agents schema, however, there will be no facts to support or fire rules. Facts can be asserted into the agents knowledge base one at a time to monitor the behavior of rules as the agents knowledge base is populated with facts.
For example, in the sample application for this tutorial, if the user wanted to check to see that the rules defining the utility lost from road construction, the user would begin by asserting the facts necessary to fire the rule. In this case, the facts trafficStopped, and laneClosed must be asserted.
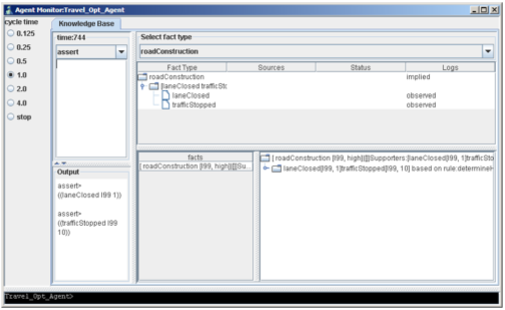
After asserting these facts into the database and after selecting roadConstruction from the FactType Selector, the IDR Fact Instance Level shows that now the road construction in I99 is high based on the asserted facts, and based on how the rule was originally intended to function, this rule is valid.
Status check. At this point in the tutorial, we have successfully implemented the agents active knowledge base, configured it for use, and validated its rules and functionality. At this point, we have the most basic agent, only capable of asserting facts and implying knowledge based on a set of rules. The next step is to use the knowledge base and pair it with a set of experiences.
rpd- the experience base
Overview. The goal of the recognition primed decision-making module is to model this particular type of decision making at a reasonable abstraction level, and to identify the information requirements during decision making. The RPD component of the agent provides a way for the agent to cue a course of action based upon the existing conditions and previous experiences. These cues are organized in an structure much like the knowledge base, except instead of knowledge and explicit facts (declarative knowledge), the experience base contains a hierarchical experience space of experiences and their cues (episodic memory), expectancies, anomalies, goals, actions, and results. Much like the way the knowledge base is organized with a FactType (schema), and Facts (explicit), the experience base is organized on two perspectives. The experience space organizes higher level experiences so that once the agent calculates the degree of a match (recognition), the agent can use other experiences found in the experience definitions. One of the unique features of the experience base is that experiences within the experience space can be organized in a variety of structures ranging from flat to hierarchical.
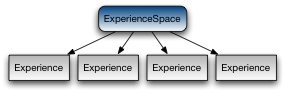
A flat experience base structure such as the one above can have a very small depth, but the breadth of experiences can be very large. Recognition in this particular model relies heavily on retrieving due to the unorganized nature of the experiences and therefore closely resembles a method of case based reasoning.
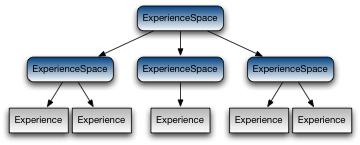
A hierarchical, or structured experience base (as seen above) can have a very large depth, but at its most efficient structure, the breadth of experiences can be very small. This particular model is very organized and recognition relies more on indexing, and therefore more closely resembles a decision tree.
The RPD process model. The Experience Base and Recognition Primed Decision-making component of R-CAST is modeled after Kleins Naturalistic Decision-making Model. Within this model, decisions are made through an evaluation and recognition of prior experience in the current situation, whether or not this situation is familiar, a series of expectancies and their cues, and mental simulation. In order to begin implementing an experience base, it is important to understand how the agent utilizes the experience base in order to make decisions.
The agent begins its experience recognition in situational analysis. At this stage, the agent decides whether or not it can recognize a past experience, or if it must plan an investigation for the missing information (feature matching). If the agent recognizes a situation, or its investigation is complete, the agent performs a mental simulation of the planned course of action (the plan written for each experience --covered in the process manager). During mental simulation, the agent applies the rules that constrain it to its environment from the knowledge base, along with the expectancies, goals, and results from the last experience and determine whether or not that particular course of action will work. Assuming the course of action is valid and accepted, the agent will implement the course of action. Lastly, after the course of action is completed and the agent is satisfied, the new experience will be added to the agents experience base. The agent will now be able to use this experience for quicker recognition or support for the next time.

ExperienceSpaces. Returning to the current example of using an agent to determine the quickest route to travel to get to work, the ExperienceSpace must be defined. Due to the nature of the problem and solution. The agents experience base is very simple because in the very end, there are really only two choices to make. However, this simplicity will make it easier to become familiar with how the experience base and process manager work together. The root [and coincidentally the only] ExperienceSpace for this example relies on a cue from the agents condition known as goToSC (go to State College). The agent receives this cue from its knowledge base, and the cue can either be yes or no.
(ExperienceSpace goToSC # ExperienceSpace definition: must be unique
(Cue (goToSC yes)) # A particular condition in the agents KB that elicits a past experience
(Expectancy (goToSC yes)) # Conditions the agents should expect in the current situation
(Anomaly (goToSC no)) # A certain condition that could result in a deviation from expectancies
(Experience (takeRouteI99)(takeRoute322)) # Linked to specific experiences or other ExperienceSpaces
)
In this particular ExperienceSpace, the expectancy (after this ExperienceSpace has been cued) is that the condition in the agents active knowledge base is that goToSC will have a value yes. In this particular instance and in most others, if the expectancy and the anomaly are both triggered, there is an inherent flaw in the agents knowledge base. However, if the expectancy is not triggered and an anomaly occurs, another course of action should be investigated. In this example, there would be no need for the agent to determine the most economical route of travel if there is no need to travel. Finally, as in the ExperienceSpace structures modeled above, each ExperienceSpace can be broken down into a reference to another ExperienceSpace or an experience. In this example, the ExperienceSpace is broken down into two possible experiences triggered by the cue goToSC yes.
Experiences. At the lowest level of each ExperienceSpace structure are experiences. Experiences, like the ExperienceSpace also use cues, expectancies, and anomalies and use fuzzy logic to calculate a match. Once a particular experience is recognized, the agent is informed of its goal and the course of action to achieve this goal. The agent validates this course of action by using a mental simulation, and if the result is acceptable, the course of action is implemented.
(Experience takeRouteI99 # Experience definition: must align with an experience in the ExperienceSpace
(Cue (roadConstruction I80 high) # Condition(s) that the agent uses to calculate a match
(traffic high)) between the current environment and this experience
(Expectancy (in StateCollege)) # What the agent should expect after the COA
(Anomaly (in somewhereElse)) # What could happen that would elicit the agent to avoid the COA
(Goal (in StateCollege)) # The goal of the COA
(Action (takeRoute I99)) # A COA linked to a Plan in the Process Manager
(Result (success)) # The result in the past experience
)
In this example, several cues such as a high level of road construction on I-80 (roadConstruction I80 high), and a dense amount of traffic on I80 (traffic I80 high) trigger the agent to use this particular experience (takeRouteI99) when these conditions in the agents environment exist. If the agent recognizes and matches this experience with the current condition of its environment, the agent will proceed to monitor the expectancies and anomalies while it simulates the course of action to reach its goal. In this case, the agent will expect that if the course of action taken in this experience is implemented, that it will end up in State College (in StateCollege), the agent will avoid the course of action if for some reason it ends up somewhere else (in somewhereElse). Assuming there is no anomaly, the agent will simulate the course of action and if the result is successful (the goal has been satisfied), the agent will implement the course of action.
Configuring the Experience Base. Before implementing the experience base and the recognition primed decision-making module into the agents configuration, the configuration file must be updated. The following values must be uniquely configured for each agent.
decisionImpl = edu.psu.rpd.RecognitionPrimedDecision # Directory location of the RPD implementation
decisionClock = 1000 # The cycle rate for decision making, in 1/1000s
decisionGUI = true # Whether or not to display the RPD user interface
ebFile = Travel_Opt_Agent.eb # Directory location of the agents experience base file
rpdRoot = goToSC # The root ExperienceSpace
rpdRetain State = true # Whether or not to retain new experiences in the EB
rpdEvaluateState = false # Whether or not to evaluate the new experiences in the EB
rpdRepeatRecognition = false # Whether or not to activate recognition after a decision is made
recognitionThreshold = 0.6 # The degree of similarity that the cues should matched
weightFailExperience = 0.5 # The amount of weight a failed experience carries relative to success (0.5 is even weight)
weightAnomaly = 1.0 # The amount of weight an anomaly carries, relative to expectancy
anomalyTimeout = 3 # How many decision cycles an agent should wait until reevaluation
Also, in addition to these values in the decision making module section of the configuration file, the agents overall configuration must also include the decision making implementation (along with the knowledge base implementation).
agentComponents = kbImpl decisionImpl
The RPD user interface. Although the RPD user interface does not offer the ability to manually insert experiences or knowledge into the experience base (like the active knowledge base user interface), the interface offers a way to visualize the current state of the agents recognition process. The State Monitor displays the current stage in the RPD decision model. Normally, in a much more complex experience base with a more complex problem, the state monitor would change dynamically with state transition and would be visually represented in the form of a flow chart.

The second visualization within the RPD user interface is the attention monitor, and its function is to represent the cognitive load and which experiences have the attention of the agent. In a situation more complex than the one in this sample agent, the visualization dynamically changes as the agent attempts to recognize prior experiences based upon the current conditions of the agents environment. The visualization attempts to keep what the agent is most concentrated on toward the center of the monitor.

Status check. At this point in the tutorial, we have successfully implemented the agents active knowledge base, configured the AKB for use, validated the AKBs rules and functionality, implemented the agents experience base and recognition primed decision-making module, and configured the RPD component for use with the knowledge base. At this point, we have a very basic agent, only capable of asserting facts, implying knowledge based on a set of rules, and matching knowledge with prior experiences. The next step is to use the AKB and RPD components and pair them with a set processes and a domain interface. This combination will allow the agent to make decisions autonomously based on its environment and pre-determined constraints, use prior experiences to implement or support a course of action, and finally, allow the agent to fully implement the course of action it has chosen.
The process manager
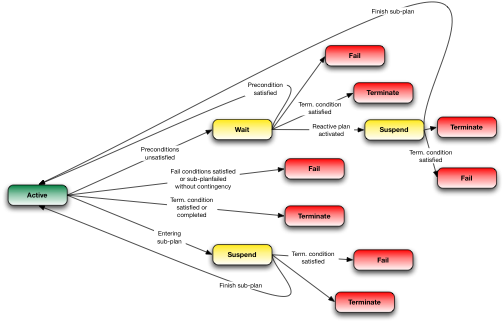
Overview. The goal of the process manager is to set into action the decision that the agent makes based upon its knowledge base and experience base. The process manager component provides the agent with the abilities to perform a variety of behaviors. Also, much like the knowledge base and experience base, each behavior defined within the process file is organized on two levels, and while the processes defined within the process manager can be extremely complex, their description of each level of abstraction is inherently simple. The highest level of abstraction within the process manager is the Operator. Operators contain the conditions (pre-, termination) and effects to call an operation to the domain adapter, in other words, the operator is the executable statement. At the lowest level within the process manager is the Plan. Plans are the conditions, linked contingency plans, choices, and linked operators that are algorithmically decomposed and evaluated in sequential order before the operator is executed. Plans can also contain links to other plans, as well as recursion. The process managers behavior (as a whole) can be described as active, suspend, wait, terminate, and fail and transitions between these states are determined by the preconditions, effects, and termination conditions.
Operators. The operators within the process manager act as the interface between the process file and the domain adapter. Operators are defined by at least a name, and may also include precondition(s) and effect(s). Within the context of the example in this tutorial, the only operator necessary for interaction with its domain is the print operator. The print operator, along with the speak operator is already defined and built in to R-CASTs default domain adapter. Any other operator must be implemented in the domain adapter before being defined and utilized in the process manager. In this example, the operator definition is quite simple.
(operator print)
Operators can also include a set of preconditions and effects as parameters for an operation. Like an experience, the operator can have one or many preconditions, in the case of many preconditions, they are evaluated conjunctively. During evaluation, if the precondition is not satisfied, the process will enter the wait state (as seen in the figure above). Effects are conditions that should be produced after the operation is complete. In the case of another example (not directly related to the one in this tutorial), a counting operator, there are necessary preconditions and effects.
(operator count (?number)
(precondition (nextNumber ?number ?next))
(effect (not(currentNumber ?number)(currentNumber ?next))
)
In this example, a precondition exists that the next number in the agents knowledge base is indeed the next number that will be counted. If not, the operator waits until the precondition is satisfied (usually by entering a contingency plan). After the operator is executed, the effect should be that the current number is not the previous number, and that the current number has been incremented. If this effect is not true, then the operation has failed.
The Domain Adapter. In order for operator definitions such as print, speak, and count to function, they must be implemented in the domain adapter. The domain adapter within R-CAST is located in /domain/src/edu/psu/domainadapter. Upon opening the file in this directory named DomainAdapter.java, the NetBeans IDE will open, displaying the current domain adapter and making it available for editing. The void-type public class action(String command, Vector args) acts as a container for the instructions on how to apply the operators. These instructions can range from simple to very complex, depending on the operation. In the particular example in this tutorial, the only operator is print, so the only instruction is a simple command to the Win32 console.
public void action(String command, Vector args) {
if (command.equalsIgnoreCase(print)) {
System.out.println(pretyString(args));
}
}
Most likely, in other examples, the use of a series of else if statements will allow other operator instructions to be defined. Instructions can also contain calls to other classes for use of more complex operations. For example, in order to utilize the speech synthesizer within R-CAST, the instruction creates a new instance of SpeechSynthesizer(pretyString(args)) and calls the speak( ) function within the class.
public void action(String command, Vector args) {
if (command.equalsIgnoreCase(print)) {
System.out.println(pretyString(args));
} else if (command.equalsIgnoreCase(speak)) {
if (config.ifSpeak( )) {
new SpeechSynthesizer(pretyString(args)).speak( );
}
}
}
In order to use the domain adapter, the agents configuration file must be modified to include its implementation. This is a required component of the agent and the following values must be added to the agents configuration file.
domainImpl = edu.psu.domainadapter.DomainAdapter # Directory location of the domain adapter implementation
domainGUI = false # Whether or not to use a user-created GUI within the domain adapter
Plans. Plans are made up of the sequential processes, conditions, and effects that the agent will use to determine a proper course of action. In each plan and as each condition is tested, variable bindings are kept. Also, termination and fail conditions are disjunctive, meaning that a termination condition can mean success or irrelevance, and a fail condition simply means failure. In this example, evaluation from the experience base is used to determine a course of action within the process manager. Because of this, the syntax used to outline this plan are relatively simple. In the plan that a particular experience is linked to, the plan takeRoute contains the final effect and the process in order to print the agents decision to the console to inform the user. In this plan, the particular route from the linked experience (?route), does not impact the outcome of this plan, and in either decision, the effect is (in StateCollege). The process is to use the operator print to inform the user through the Win32 console of the agents final decision.
(plan takeRoute (?route)
(effect (in StateCollege))
(process
(print take ?route))
)
Missing from this particular plan from this example is the fail condition and termination condition. Plans can also contain instructions to launch a contingency plan in the event that the fail condition is met. In the following code snippet, the contingency plan if the fail condition is met calls another plan called planCountBack.
(plan planCountFromTo (?from ?to)
(failcondition (< ?to ?from))
(contingency (planCountBack))
(termcondition (currentNumber ?to))
(process
(planCountCurrent)
)
)
Fail conditions and contingency plans work together similarly to the Java try-throw and catch error functions. In other words, if there is a contingency plan for a process that satisfies a fail condition, that contingency plan will be instantiated. Otherwise, the fail state will throw back to its parent process and will once again check if that process has a contingency and decide to execute that contingency plan or throw back to the next parent process.
Processes. At the root of all plans is the process. The process contains the instructions that the agent will follow in its active state (meaning that the agents pre-, term-, or fail conditions have not suspended, terminated, or caused the course of action to fail). Processes are followed in sequential order, and all steps must be defined as plans, sub-plans, choices, or operators. There is also no support for while loops or agent binds within the process instruction set.
Choices. Along with calling an operator, a plan, or a sub-plan, processes can also contain nested instructions called choices. Unlike plans or operators within the process instruction set, choices are defined within the instruction set. Choices contain preferred conditions with actions and a default action. Preferred conditions are conjunctive, and are not necessarily evaluated in the order in which they are defined. Also, choices themselves are not prioritized based on its order within the process instruction set, but the priority is not random either. The last instruction within the choice is the default action. Default actions must be defined for each choice and will be executed in the event that all the preferred conditions in the choice are not satisfied. In the example in this tutorial, using a choice within a process instruction set is not necessary.
(process
(choice bigOrSmall
((prefcondition (> ?number 7))
(print big))
(prefcondition (< ?number 3))
(print small))
((default) (print normal))
)
)
In this example, the value of the variable ?number is evaluated based on two preferred conditions. Within each condition is an action which can be either a plan or an operator. In the event that the value of ?number does not meet any of the other conditions, (?number is 3, 4, 5, 6, or 7) the default action is executed which can also be either a plan or an operator.
Configuring the PM. Before implementing the experience base, the recognition primed decision-making module, and the process manager into the agents configuration, the configuration file must be updated. The following values must be uniquely configured for each agent.
processImpl = edu.psu.seqprocess.ProcessManager # Directory location of the process manager implementation
processFile = Travel_Opt_Agent.process # Directory location of the agents .process file
processInititalProcess = null # The initial process that the agent should execute
processClock = 2000 # The cycle rate for the process manager, in 1/1000s
processGUI = true # Determine whether or not to use the process manager GUI
operatorSpeak = false # Determine whether or not to use the speech synthesizer
processTerminateIfEnd = false # True: process will terminate at end; False: process will repeat at the end
processRemoveIfInactive = false # True: terminated process will be removed from the process set
# False: keeps terminated process in the process set
simulationNewKB = true # If the simulation should be in a new (cloned) KB, or in the agent's current KB
simulationRelaxPrecond = true # If precondition is tested, will the result affect the execution of the simulation?
# True: the result will not affect; False: the failed precondition will stop the simulation
simulationTestPrecond = true # If the precondition is going to be tested in the simulation
simulationDepth = 1 # How many levels will the simulation decompose a process
Also, in addition to these values in the process manager of the configuration file, the agents overall configuration must also include the process manager implementation (along with the knowledge base implementation and experience base implementation).
agentComponents = kbImpl decisionImpl processImpl
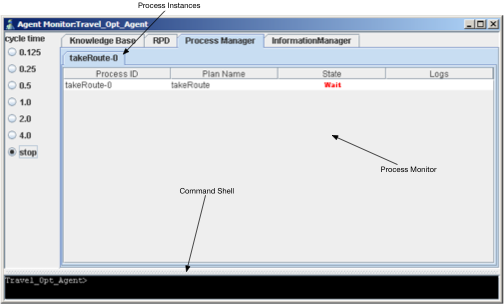
The PM user interface. The Process Manager user interface provides a way to list and organize the plans within the process manager and its current state. The Process Manager displays each plan instance in the form of a tab and within these tabs is the process monitor. The process monitor is a table of the Process ID, Plan Name, State, and Log for each process within the plan instance. User input is limited to the command shell and only a few commands.
Schedule: manually executes a plan ( schedule (plan_name) )
Terminate: manually terminates a plan ( terminate (process_ID) )
List Processes: lists all available processes ( listProcesses )
Simulate: manually simulates a plan ( simulate (plan_name arguments) )
Status check. At this point in the tutorial, we have successfully implemented the agents active knowledge base, configured the AKB for use, validated the AKBs rules and functionality, implemented the agents experience base and recognition primed decision-making module, configured the RPD component for use with the knowledge base, and linked experiences to a set of plan and processes to realize a course of action based off of the decision the agents makes using the knowledge base and experience base. At this point, we have a simple decision-making agent, capable of asserting facts, implying knowledge based on a set of rules, matching knowledge with prior experiences, and making a decision and following an appropriate course of action. The next step is to run the agent in its simulation environment.
configuring an agent
Final configurations. Before running all of the agents components together for the first time, a few modifications to the agents configuration file still remain. The Request Whiteboard and the Information Manager are required components of any agent.
Request Whiteboard. The Request Whiteboard handles all of the communication between the agents components in the form of requesters, requests, and responders. The Request Whiteboard can also take advantage of a built-in user interface that allows the user to view an organized table of each request (similar to the Process Manager user interface). Though using the user interface is optional, implementation of the Request Whiteboard is not, and in order to implement the Request Whiteboard, the following values must be added to the agents configuration file.
whiteboardClock = 1000 # The thread cycle time for requests, in 1/1000s
whiteboardGUI = true # Whether or not to use the Request Whiteboards user interface
Information Manager. The Information Manager component handles all of the information needs for each agent component. In this particular example, the agent has a complete knowledge base with all of the facts and asserted knowledge to successfully make its decision. However, the Information Manager must still be configured within the agents configuration file.
imImpl = edu.psu.irp.InformationManager # Directory location of the Information Manger Implementation
defaultStrategyImpl = edu.psu.irp.Strategy.InqueryOrientedInvestigationStrategy # Directory location of the # default investigation strategy implementation
imClock = 1000 # The thread cycle time of the Information Manager, in 1/1000s
imGUI = true # Whether or not to use the Information Manager user interface
defaultSupplyMode = edu.psu.irp.mode.AskReply # Directory location of the default supply mode
defaultRequiredTime = 500 # Time requirements for needed information
anticipateProcessPrecondition = true # The following values activate R-CASTs anticipation modes
anticipateProcessFailCondition = true
anticipateRPDCue = true
anticipateRPDExpectancy = true
anticipateRPDAnomaly = true
In the event that there is missing information, the Information Manager handles the scheduling and completion of investigations. Requests for an investigation are handled by the Request Whiteboard. It is important to note that in order for the Information Manager to complete its investigation there must be a way for the agent to pull information, either through directly asserting facts into the agents knowledge base, or executing a plan to gather information. These requests and investigations can be seen by using both the Request Whiteboard and the Information Manager user interfaces.
In the following screenshots, the Information Manager is anticipating facts about roadConstruction that is not contained in the agents knowledge base. Because of this, the agent is unable to fire rules to assert knowledge and make a decision.
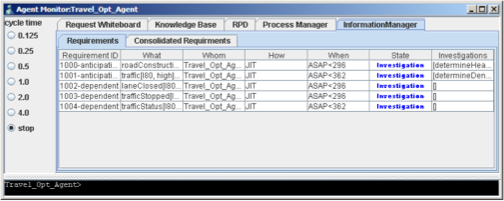
A request for an investigation is handled through the Request Whiteboard (as seen in the previous figure). A request named Investigate Information has been requested by the RPD module for facts about roadConstruction (I80 ?utility). This particular request is being handled by the information manager.
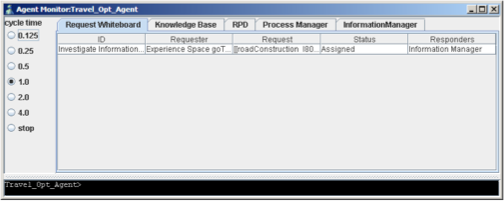
Because there is no plan for investigation, the agent is waiting for facts to be asserted into the knowledge base through the AKB user interface.
Agent Run-time
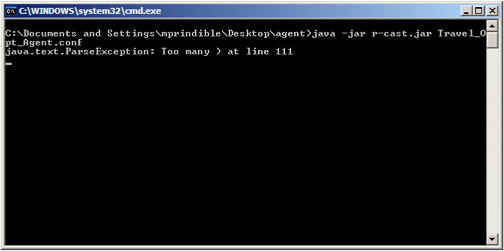
Identifying syntax errors. Because R-CAST does not directly support any type of debugging for the knowledge base, experience base, or process manager, correction of syntax errors must be carefully done by using errors thrown and displayed by R-CAST in the console window. Syntax errors are generally easy to catch and fix, and the most common error is usually a spelling mistake or too many parentheses.
Identifying logic errors. Logic errors also throw exceptions within the console windows, however, they are usually a bit more unclear as to where the error is taking place. Common logic errors usually involve misused arithmetic operators within the rules, or not having a direct path of logic between the knowledge base and experience base, usually in the experience cues. Logic errors can also be eliminated much easier before run-time if each agent component is examined after its completion in order to reduce the risk of uncontrollable logic errors in the remaining components.
Run-time. After ensuring that each agent component is operating as expected, the agent can be run in its simulation environment by running the MS-DOS batch file with each of its components defined in the agents configuration file.
agentComponents = kbImpl decisionImpl processImpl domainImpl imImpl
Whats next?
Status check. At this point in the tutorial, we have successfully created a simple agent using decision-making modeling and the R-CAST architecture. But more importantly, we have become more familiar with the syntax and logic behind each of R-CAST and the agents core components. Although the example within this tutorial performed a very trivial task, it allowed us to understand how each component interacts without getting lost in complexity. By using this same tutorial, other, more complex decision-making agents can easily be made. However, as described in the introduction to R-CAST, there are many configurations of agents that can utilize R-CAST, one such being multi-agent systems that use information sharing.
Multi-agent systems and information sharing. R-CASTs true potential can be reached using a multi-agent configuration that is very modular and relies on information sharing to reach peak performance. In the next tutorial, a system in which 3 agents interact by sharing and distributing relevant information to make various decisions and perform individual emergent behaviors to solve a shared goal will be covered.
appendix A
Sample active knowledge base file. The following is the entire active knowledge base for the sample agent used in this tutorial.
#
# Agent Knowledge Base File for Agent "Travel_Opt_Agent"
#
# The Fact Types
(FactType gasPrice (?gasPrice))
(FactType gasPriceUtility (?utility))
(FactType roadConstruction (?route ?utility))
(FactType laneClosed (?route ?numberOfLanes))
(FactType trafficStopped (?route ?howLong))
(FactType traffic (?route ?utility))
(FactType trafficStatus (?route ?density))
(FactType goToSC (?yesOrNo))
(FactType in (?where))
# The Rules
(Rule "determineHighGasPrice"
(gasPrice ?gasPrice)
(>= ?gasPrice 2.95)
->
(gasPriceUtility high)
)
(Rule "determineLowGasPrice"
(gasPrice ?gasPrice)
(< ?gasPrice 2.95)
->
(gasPriceUtility low)
)
(Rule "determineHeavyRoadConstruction"
(laneClosed ?route ?numberOfLanes)
(>= ?numberOfLanes 1)
(trafficStopped ?route ?howLong)
(>= ?howLong 10)
->
(roadConstruction ?route high)
)
(Rule "determineModerateRoadConstruction"
(laneClosed ?route ?numberOfLanes)
(eq ?numberOfLanes 1)
(trafficStopped ?route ?howLong)
(< ?howLong 10)
->
(roadConstruction ?route moderate)
)
(Rule "determineLowRoadConstruction"
(laneClosed ?route ?numberOfLanes)
(< ?numberOfLanes 1)
(trafficStopped ?route ?howLong)
(< ?howLong 10)
->
(roadConstruction ?route low)
)
(Rule "determineDenseTraffic"
(trafficStatus ?route ?density)
(>= ?density 6)
->
(traffic ?route high)
)
(Rule "determineLightTraffic"
(trafficStatus ?route ?density)
(<= ?density 5)
->
(traffic ?route low)
)
# The Facts
(Fact gasPrice (2.79))
(Fact laneClosed (I99 0))
(Fact laneClosed (I80 2))
(Fact trafficStopped (I99 3))
(Fact trafficStopped (I80 20))
(Fact trafficStatus (I99 1))
(Fact trafficStatus (I80 7))
(Fact goToSC (yes))
appendix b
Sample experience base file. The following is the entire experience base for the sample agent used in this tutorial.
#
# Agent Experience Base File for Agent "Travel_Opt_Agent"
#
# Experience Space
(ExperienceSpace goToSC
(Cue (goToSC yes))
(Expectancy (goToSC yes))
(Anomaly (goToSC no))
(Experience (takeRouteI99)(takeRouteI80)
)
)
# Experiences
(Experience takeRouteI99
(Cue (roadConstruction I80 high)(traffic I80 high))
(Expectancy (in StateCollege))
(Anomaly (in somewhere))
(Goal (in StateCollege))
(Action (takeRoute I99))
(Result success)
)
(Experience takeRouteI80
(Cue (roadConstruction I99 high)(traffic I99 high)(gasPriceUtility low))
(Expectancy (in StateCollege))
(Anomaly (in somewhere))
(Goal (in StateCollege))
(Action (takeRoute I80))
(Result success)
)
appendix c
Sample process file. The following is the entire process file for the sample agent used in this tutorial.
#
# Agent Process File for Agent "Travel_Opt_Agent"
#
# Operators
(operator print)
# Plans
(plan takeRoute (?route)
(effect (in StateCollege))
(process
(print take ?route))
)
appendix d
Sample configuration file. The following is the entire configuration file for the sample agent used in this tutorial.
#
# Agent Configuration File for Agent "Travel_Opt_Agent"
#
# About the Agent's Overall Configuration (the agent name, must be unique for each agent)
agentName = Travel_Opt_Agent
agentIcon = agent.gif
# The components of the agents
agentComponents = kbImpl decisionImpl processImpl domainImpl imImpl
# comImpl taskImpl recommendImpl resourceImpl
# To show GUI, or not? If false, no GUI will be shown even if you decide to use a component GUI
useGUI = true
# The relative speed, will affect all components speed(cycleSpeed * processClock)
cycleSpeed = 1.0
# Initial status of agent, stopped if choose "true"
isStoped = false
displayedMessage = Count Inform
# About Request Whiteboard (The whiteboard is a built-in component and it is a must)
# The thread cycle time for the whiteboard, in 1/1000 sec
whiteboardClock = 1000
# Use whiteboard GUI or not?
whiteboardGUI = true
# About the Domain Adapter
# The domain implementation must be selected when using a process manager
domainImpl = edu.psu.domainadapter.ExampleDomainAdapter
# Use domain GUI or not, ExampleDomainAdapter doesn't have a GUI
domainGUI = false
# About the Knowledge Base
# The Knowledge Base implementation
kbImpl = edu.psu.activeknowledgebase.AKB
# The .kb file for this agent
kbFile = Travel_Opt_Agent.kb
# The thread cycle time for the KB, in 1/1000 sec
kbClock = 1000
# Show the KB GUI or not
kbGUI = true
# If you want to hear a voice when query for a natural reply
kbSpeakNatrualReply = false
# About the Process Manager
# The implementation of the Process Manager
processImpl = edu.psu.process.ProcessManager
# The .process specification file
processFile = Travel_Opt_Agent.process
# The initial process that the agent should execute, null for none
processInitialProcess = null
# The clock cycle for Process Manager, in 1/1000 sec
processClock = 2000
# If or not to show the Process Monitor
processGUI = true
# If you want to enable voice for speak operator
operatorSpeak = false
# true, process will terminate at end; false, the process will repeat at the end
# false, then you should define termination conditions to terminate processes
processTerminateIfEnd = true
# true, a terminated process will be removed from the process set
# false, if you want to keep dead process (cost more memory)
processRemoveIfInactive = true
# If the simulation should be in a new (cloned) KB, or in the agent's current KB agent should simulate in a new KB
simulationNewKB = true
# If precondition is tested, will the result affect the execution of the simulation? true, the result will not affect; false, the failed
# precondition will stop the simulation
simulationRelaxPrecond = true
# If the precondition is going to be tested in simulation
simulationTestPrecond = true
# How many levels will simulation decompose a process
simulationDepth = 1
# Recogntion Primed Decision Making
# The RPD implementation
decisionImpl = edu.psu.rpd.RecognitionPrimedDecision
# The cycle for decision as in 1/1000 sec
decisionClock = 1000
# To show the decision monitor or not
decisionGUI = true
# The experience specification file
ebFile = Travel_Opt_Agent.eb
# The root experience
rpdRoot = goToSC
# Activate retain state or not
rpdRetainState = false
# Activate evaluate state or not
rpdEvaluateState = false
# Activate recognition state when decision is done
rpdRepeatRecognition = false
# How much the degree of similarity should the cues be matched
recognitionThreshold = 0.6
# How much fail experiences weight compared with success experience
weightFailExperience = 0.5
# How much anomalies should weight, compared with expectancy
weightAnomaly = 1.0
# How may decision cycles an agent should wait till reevaluate a anomalied experience space
anomalyTimeout = 3
# The Information Manager
# The implementation of the Information Manager
imImpl = edu.psu.irp.InformationManager
# The default investigation strategy
defaultStrategyImpl = edu.psu.irp.strategy.InqueryOrientedInvestigationStrategy
# The cycle time for the IM, in 1/1000 sec
imClock = 1000
# To display the IM GUI or not
imGUI = true
# The default supply mode
defaultSupplyMode = edu.psu.irp.mode.AskReply
# The default time condition, when information is needed
defaultRequirementTime = 500
# If to anticipate a precondition
anticipateProcessPrecondition = true
# If to anticipate a termination condition
anticipateProcessTermcondition = true
# If to anticipate a fail condition
anticipateProcessFailcondition = true
# If to anticipate cues
anticipateRPDCue = true
# If to anticipate an expectancy
anticipateRPDExpectancy = true
# If to anticipate an anomaly
anticipateRPDAnormaly = true
The Laboratory for Intelligent Agents | 324 Information Sciences and Technology Building | University Park, PA 16802